
Reece Payne | Security Consultant | 12 June 2018
Have you taken the plunge and decided to use Azure AD as an addition to your arsenal of identity and access management tools? Do you also work for a company that has requirements around monitoring and logging user activity, or are you just interested in seeing who works late? Regulations got you down and not sure how you'll meet them? This article is a good starting place for getting user activity logs out of Azure AD and somewhere that is useful to you!
My main audience includes people who were in the same situation I was, trying to figure out how to get something, anything out of Azure AD. Specifically, you might be a security manager looking at options for monitoring users and getting alerts for cheeky user behaviour, or an architect trying to see if Azure AD can meet some of the security requirements you've been given.
Azure AD is a pretty shiny piece of kit, with SSO integrations, MFA, user management and access reviews all a part of the platform (depending on the license class you sprint for, that is). When it comes to reporting you are given the following options:
The three most useful APIs are:
For this article I'm going to focus on the Risky Sign-In API, however the same general concepts will apply to the other two. All of these APIs are located in the Microsoft Graph API, which are a set of lower-level APIs that allow you to play around with the users and configuration of Azure AD. While the documentation varies on the exact functionality you are after. They are just oData APIs, so if you know how they work, this article might be old news.
Before continuing, you're going to need the following:
Interacting with the Graph API isn't too difficult, however whatever language you choose is going to need an HTTP library. I originally wrote my integration in PowerShell and will be using Python for this article, but anything that talk HTTP is fine.
We're going to start easy. Initially we just want to get our script talking to the Risky Sign-In API, and at least get something back. The API is located at the following URL:
https://graph.microsoft.com/beta/identityRiskEvents
Now you just simply need to run up Postman or CURL and hit that URL and you're... well, no, it's not actually that easy. This API uses oAuth to authenticate all access and because it's oAuth we actually have to go somewhere else to authenticate. So let's get that sorted first.
To authenticate via oAuth we're going to need the following information:
As mentioned above, the graph API uses OpenID Connect/oAuth extensively. The two main ways of authenticating to the Graph API are either:
I'm assuming you don't want to have administrative credentials for Azure AD just sitting in a script, so we're going to go down the 'service principal' path.
Before we even start trying to write any code we need to do a little bit of pre-work and set everything up in Azure AD.
The first step is to log in to the Azure AD admin panel. The easiest way to do this is log in via https://portal.office.com and locate the Admin panel (if you have the correct permissions you should see it on the home screen once you log in).
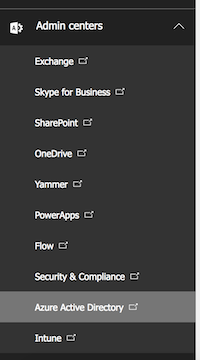
Once you're in the Admin Panel you should see a section on the left called "Admin Centers". From there just click on the "Azure AD" button. Bam! You're in!
If the Azure AD admin panel looks familiar to you it's because it's actually a part of the general Azure console. If you've claimed ownership of your tenant inside a normal Azure you will see the Azure AD associated with Office 365 if you log in via the normal Azure Portal login.
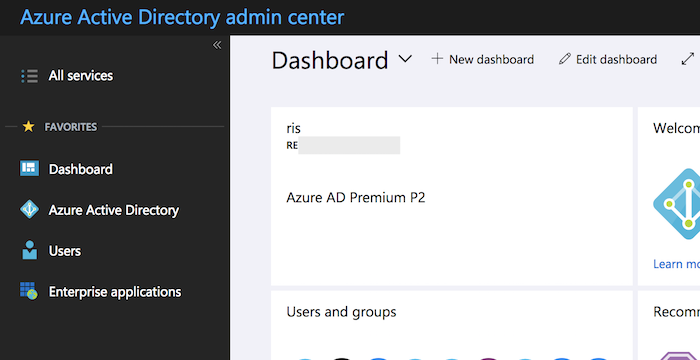
Once you've logged in, you should see something like the above screen. This is the Azure AD dashboard, with the usual dashboardy things like reports, shortcuts and summaries of users and activity. It might not look exactly the same, as the content of the dashboard depends on the Azure AD license class you have (basic, P1 or P2). If you're just playing around you can get a trial P1 or P2 license.
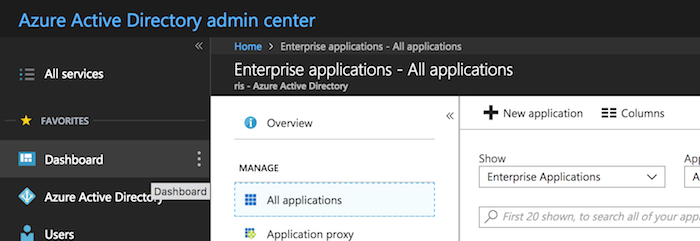
Next you're going to want to click on the "Enterprise Applications" link. Here you're going to want to click on the "New Application" link.
You'll then see another screen with a list of applications, but if you look to the left you'll see a big box called "An app you're developing". Follow the prompts until you get to the following screen:
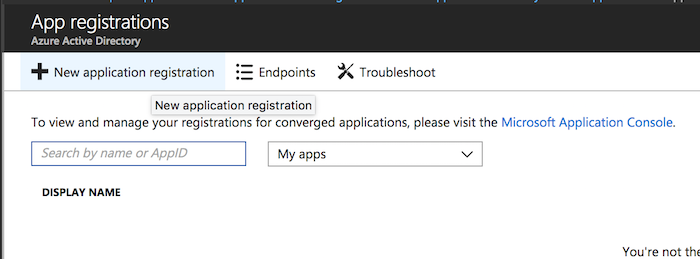
And click "New application registration". This will then set up a new application.
I'll pause here for a moment just to explain. Azure AD, thanks to the way it implements oAuth, can give applications administrative access to bits and pieces of itself. In this case we'll be giving the script we're writing permissions to pull data from the logging and reporting APIs, however you can give an app permissions to view calendars, emails, and leave messages in activity streams of users, amongst other things.
Once you've clicked on "New application registration" you should see the following:
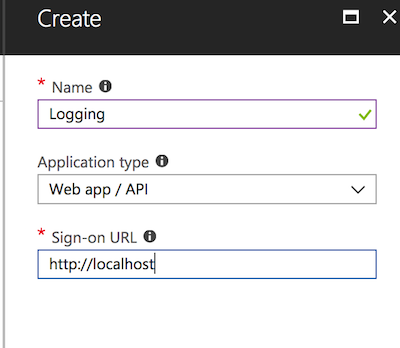
Give your app a suitable name. I called mine "logging", but you can call it whatever you like, just remember what it is called so you don't delete it later.
For application type just leave it as the default "Web app / API". We're not writing a web app, but the paradigm that Microsoft uses is in terms of other applications that may want to authenticate users and access the Graph API on their behalf.
Finally you have to define a sign-on URL. This doesn't matter, we're not creating an app that can be signed in to, but Azure AD requires something. Set it to whatever you like, just make sure it's not a URL for an actual application.
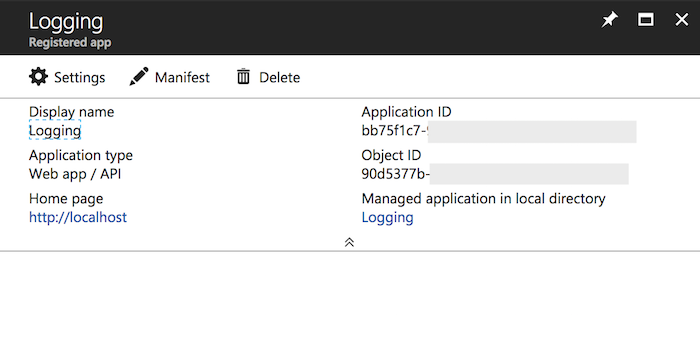
Et voila! You've created an app registration! There's one important element in the picture above, and that's the "Application ID". This will be your "Client ID". Copy and paste it somewhere for safe keeping.
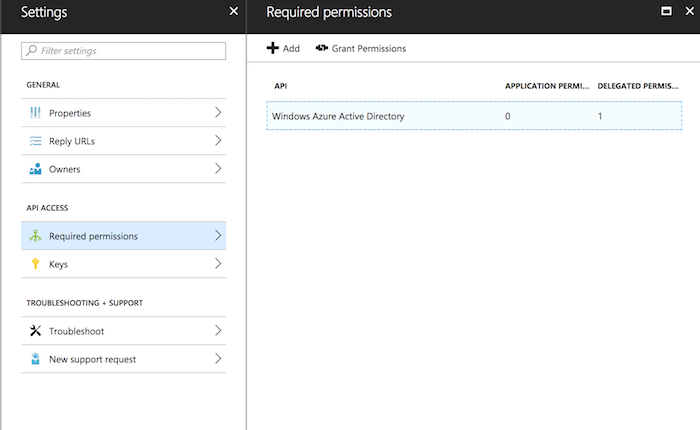
Now click on "Settings":
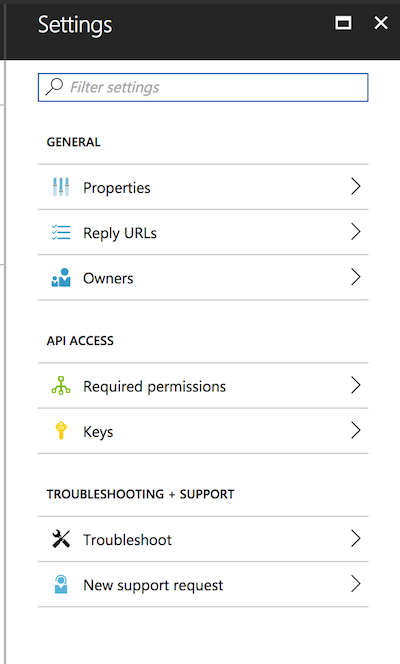
These are the settings we have available. The two areas of interest are "Required Permissions" and "Keys". Let's start with Keys, where we will set up our Client Secret.

This is where we define our app keys, or client secrets. Give your key a name and set an expiry period. You have three options, the key expires in one year, two years or never.
For those of you who pick the third option, I can hear the spurs from here, keep on riding cowboy.
Finally click the "Save" button up the top. You have to do this to see the key that will be generated.
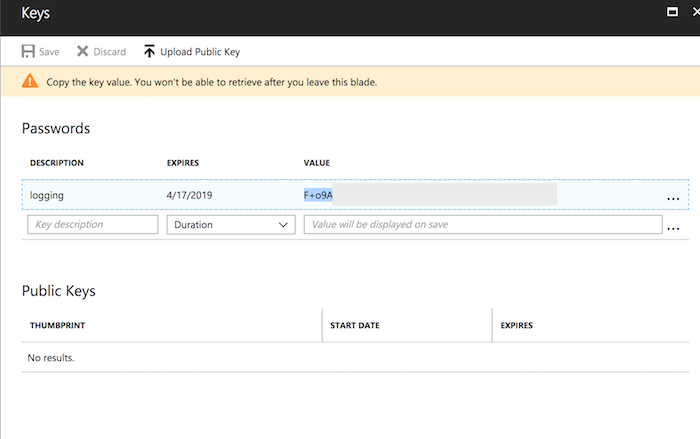
You only have one chance to copy this key. Do so now, I'll wait. All done? Let's continue then. Treat this key with care, especially for production tenants. Don't accidentally commit it to GitHub, or any other public repository, it's like any other application secret, be careful where it goes.
The next step is permissions:
Click on "Required permissions" and then the "Add" button in the top left. You will then go through two steps. Selecting the APIs the app needs access to, and then the specific permissions within that API:
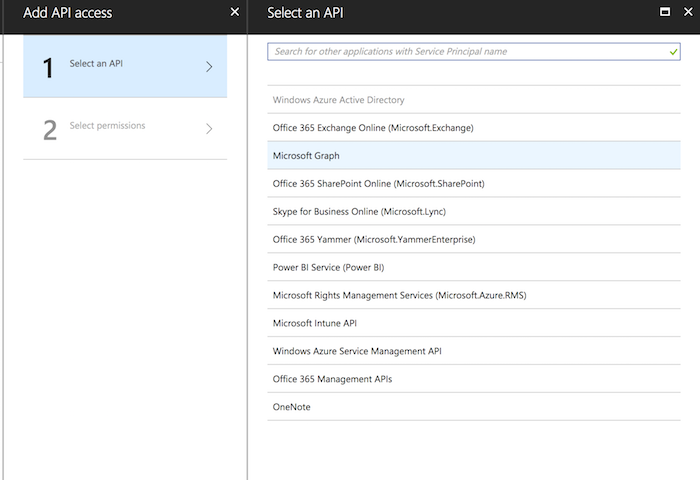
Choose "Microsoft Graph", this is where the user logging is.
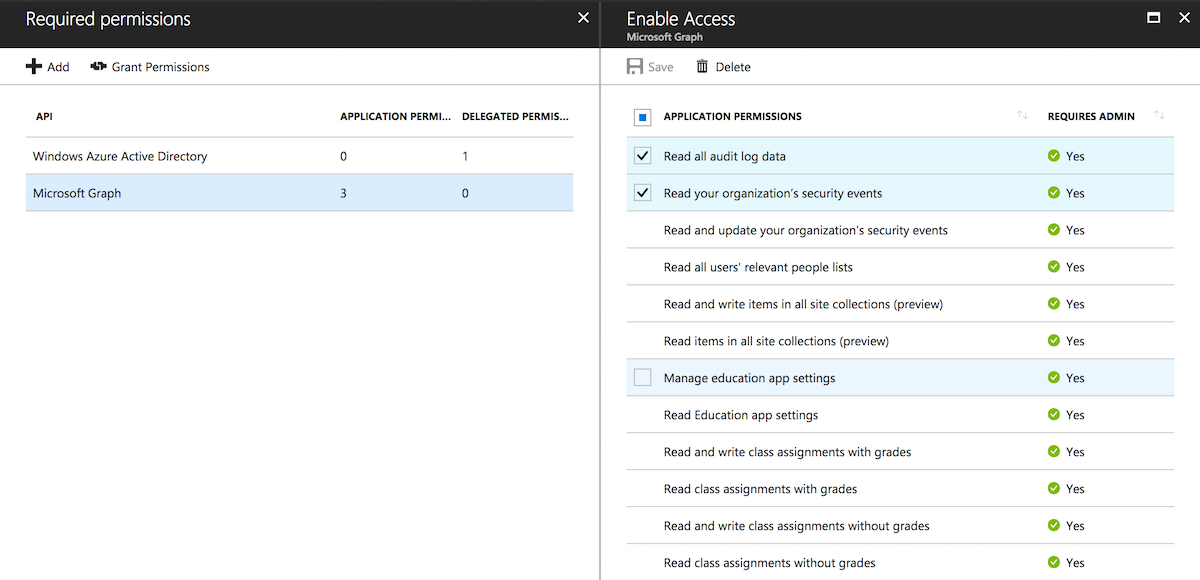
And then tick the following:
Or, if you have the kind of spurs that would make your average cattle-rustler jealous just tick the box next to "Application Permissions" to give your app everything. Not recommended though, but sometimes YOLO I guess.
Once that's done you'll want to grant permissions, see the highlighted button in the below screenshot:
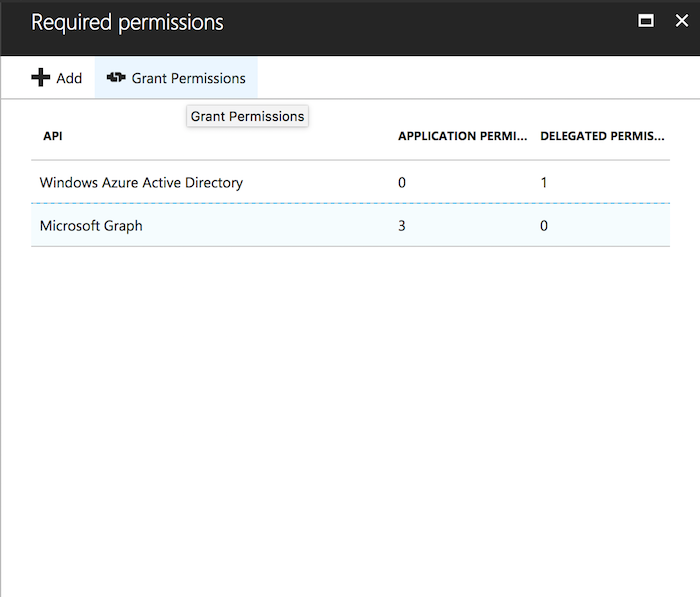
Click yes on the next prompt.
What we should have now is the configuration for our app all set up. Now we can get on to some fun stuff.
Now we should have:
We also need some additional information. I'm writing this in Python (3.6.3), so feel free to follow along with me or make it work with your language of choice.
First things first I'm going to define a dictionary containing some important bits and pieces we need to keep track of. As you can see I've saved my Client ID and Client Secret.
tenantparams = {
    "clientid": "yourclientid",
    "clientsecret": "yourclientsecret",
    "loginurl": "https://login.microsoftonline.com/",  # The endpoint our script will authenticate to.
    "tenantdomain": "yourdomain",
    "resource": "https://graph.microsoft.com"
}
The additional parameters that we need are:
When we call the login URL we are asking for an oAuth token with:* Permission to access the graph API;* On behalf of our tenant domain, yourdomain.onmicrosoft.com.
Now for some boiler plate, I'm using the requests library as the HTTP client in Python. I could try and use URLLib, but requests is generally easier.
pip install requestsA handy note, I'm also using a virtual environment. If you're not using virtual environments with python you need to get them in to your life.
Additionally there's a few more libraries that I'm going to use as I write this script. Put this right at the top of your script.
import requests
import json
import pprint
import time
import datetimeNext we're going to build the body of our authentication request. Requests is quite handy, you can give it a dictionary of values, and it will handle converting that dictionary in to a form encoded string.
# And our body for Authentication. Requests automatically translates this to a form encoded message body.

body = {
    "granttype": "clientcredentials",
    "resource": tenantparams["resource"],
    "clientid": tenantparams["clientid"],
    "clientsecret": tenantparams["client_secret"]
}

url = tenantparams["loginurl"]+tenantparams["tenantdomain"]+"/oauth2/token?api-version=1.0"

# And now we make our request.

auth_response = requests.post(url, data=body)

print(auth_response.content)
If you paste in all the code I've dumped so far (shown below) you should have successfully authenticated!
import requests
import json
import pprint
import time
import datetime

# Some handy parameters.
tenantparams = {
    "clientid": "yourclientid",
    "clientsecret": "yourclientsecret",
    "loginurl": "https://login.microsoftonline.com/",  # The endpoint our script will authenticate to.
    "tenantdomain": "yourdomain",
    "resource": "https://graph.microsoft.com"
}

# And our body for Authentication. Requests automatically translates this to a form encoded message body.
body = {
    "granttype": "clientcredentials",
    "resource": tenantparams["resource"],
    "clientid": tenantparams["clientid"],
    "clientsecret": tenantparams["client_secret"]
}

# Build our login URL.

url = tenantparams["loginurl"]+tenantparams["tenantdomain"]+"/oauth2/token?api-version=1.0"

# And now we make our request.
auth_response = requests.post(url, data=body)

print(auth_response.content)
This will give you back something that looks like this:
{
    "token_type":"Bearer","expires_in":"3599","ext_expires_in":"0","expires_on":"1523968708",
    "not_before":"1523964808","resource":"https://graph.microsoft.com",
    "access_token":"lots of text"
}
Congratulations, you've just authenticated. If you don't see this, it hasn't worked. This is what oAuth looks like, specifically the client credentials grant type, the detail of which is for another blog. The important bits are the "token_type" and the "access_token". We need them for our next step, so let's actually put them to use and get some data!
The following code goes below the last set, this will get us some logs.
# And now I realise that I probably didn't need to import json up above.
token = auth_response.json()

# The URL we want to get data from
riskysignin_url = "https://graph.microsoft.com/beta/identityRiskEvents"

# We need to send an Authorisation header to get anything from the API.
headers = {
    "Authorization": token["tokentype"]+" "+token["accesstoken"]
}

riskyresponse = requests.get(riskysigninurl, headers=headers)

print(risky_response.content)
If it all worked, you should see some JSON come in. The API only stores 30 days of events, and if you have no risky events (lucky you) you will see nothing except some empty JSON.
If you have some risky events you should see something like the below JSON (I've edited some of the sensitive stuff out). I use a VPN a fair bit, and was also playing around with TOR at one point, so I have a few events. You can use a VPN, or TOR, or travel to the other side of the earth in under twenty hours to trigger some events to test with yourself. Alternatively, just put your credentials on Pastebin, I'm sure some suspect stuff will happen pretty quick.
{   '@odata.context': 'https://graph.microsoft.com/beta/$metadata#identityRiskEvents',
    '@odata.nextLink': 'https://graph.microsoft.com/beta/identityRiskEvents?$skip=100',
    'value': [   {   '@odata.type': '#microsoft.graph.impossibleTravelRiskEvent',
                     'closedDateTime': None,
                     'createdDateTime': '2018-03-06T09:51:24.2235435Z',
                     'deviceInformation': ';Windows 10;Some Web Browser;',
                     'id': '2018-03-06T09:00:00.00000001003BFFD9686A390185.230.127.27',
                     'ipAddress': '1.1.1.1',
                     'isAtypicalLocation': False,
                     'location': {   'city': 'ES',
                                     'countryOrRegion': None,
                                     'geoCoordinates': None,
                                     'state': None},
                     'previousIpAddress': '4.15.10.3',
                     'previousLocation': {   'city': 'Somewhereton',
                                             'countryOrRegion': ' AU',
                                             'geoCoordinates': None,
                                             'state': ' Victoria'},
                     'previousSigninDateTime': '2018-03-06T07:45:48Z',
                     'riskEventDateTime': '2018-03-06T09:51:24.2235435Z',
                     'riskEventStatus': 'active',
                     'riskEventType': 'ImpossibleTravelRiskEvent',
                     'riskLevel': 'medium',
                     'userAgent': 'Mozilla/5.0 (Windows NT 10.0; Win64; x64; '
                                  'rv:58.0) Gecko/20100101 Firefox/58.0',
                     'userDisplayName': 'Reece Payne',
                     'userId': '7091b2db-6126-48ed-a9be-89bf47170ab8',
                     'userPrincipalName': 'user@domain.com'}
                 ]}
The full script at this point:
import requests
import json
import pprint
import time
import datetime

#Some handy parameters.
tenantparams = {
    "clientid": "yourclientid",
    "clientsecret": "yourclientsecret",
    "loginurl": "https://login.microsoftonline.com/",  # The endpoint our script will authenticate to.
    "tenantdomain": "yourdomain",
   "resource": "https://graph.microsoft.com"
}

# And our body for Authentication. Requests automatically translates this to a form encoded message body.
body = {
    "granttype": "clientcredentials",
    "resource": tenantparams["resource"],
    "clientid": tenantparams["clientid"],
    "clientsecret": tenantparams["client_secret"]
}

#Build our URL.
url = tenantparams["loginurl"]+tenantparams["tenantdomain"]+"/oauth2/token?api-version=1.0"

# And now we make our request.
auth_response = requests.post(url, data=body)

# And now I realise that I probably didn't need to import json up above.
token = auth_response.json()

# The URL we want to get data from
riskysignin_url = "https://graph.microsoft.com/beta/identityRiskEvents"

# We need to send an Authorisation header to get anything from the API.
headers = {
    "Authorization": token["tokentype"]+" "+token["accesstoken"]
}

riskyresponse = requests.get(riskysigninurl, headers=headers)

reportjson = riskyresponse.json()

prettyprint = pprint.PrettyPrinter(indent=4)

prettyprint.pprint(report_json)
Okay, so what do we have now? Well, we're authenticating to Azure AD to get permission to access the logging API, then we're calling that API (with our Access Token) and pulling back some data. There's a couple more things we need to do though:
I'll caveat this section with the fact that the Azure AD tenant I'm using doesn't have more than 100 risky sign in events, but in theory the below code should work fine. The below code goes right beneath where we left off last time.
finished = False # Setting up a loop variable to let us know when we've looked at all the data in the API for our query.

nextlinkurl = reportjson["@odata.nextLink"] # Getting the URL for the next set of events.

reports = [] # Setting up a list that will hold all of the event reports as we follow nextlink.

reports.append(report_json) # And we will add our first report we got above. For some reason there's always an
                            # @odata.nextLink, even when there are less than 100 records in the first returned query.

# While we have records to look up.

while not finished:

    # Go and fetch the next 100 reports and get them as a dectionary.
    risky_response = requests.get(nextlink_url, headers=headers)
    nextlink_report = risky_response.json()

    # If @odata.nextLink is not present we have no more records to find. We're finished!
    if "@odata.nextLink" not in nextlink_report:
        finished = True
        print("Finished following @odata.nextLink")

    # However, as above, the second last set of events still has an odata.nextLink as an empty set, so we need to check
    # if there's no more data and not write a report.
    if not nextlink_report["value"]:
        print("No additional reports found.")
    else:
        # Otherwise add the new events to our reports list.
        reports.append(nextlink_report)
        print("Found "+str(len(nextlink_report["value"]))+" reports.")
The code above follows the @odata.nextLink element in our returned JSON, for each page of records we return. Each set of records is appended to a list called "reports".
The first bit of the above code sets up things for our while loop. I'm sure there would be a better way to do this, but it's the way I'm aiming to get this done. I set up a variable called "finished" which we will set to True when we get no more results back from the API.
We also extract the URL from the @odata.nextLink element, which looks something like "https://graph.microsoft.com/beta/identityRiskEvents?$skip=100". Finally we set up a list called "reports" and add the first page that we already have.
finished = False # Setting up a loop variable to let us know when we've looked at all the data in the API for our query.

nextlinkurl = reportjson["@odata.nextLink"] # Getting the URL for the next set of events.

reports = [] # Setting up a list that will hold all of the event reports as we follow nextlink.

reports.append(report_json) # And we will add our first report we got above. For some reason there's always an
                            # @odata.nextLink, even when there are less than 100 recirds in the first returned query.
As an aside, there's also a URL related to an element called "@odata.context", which is part of the odata spec. It our case it returns a bunch of metadata about the information returned from this API. It's all XML, however clients or libraries that handle odata out of the box may be able to use it to add additional context to the data returned from the API.
Moving on to the loop that goes through each of the pages in the results set.
# While we have records to look up.
while not finished:

    # Go and fetch the next 100 reports and get them as a dectionary.
    risky_response = requests.get(nextlink_url, headers=headers)
    nextlink_report = risky_response.json()

    # If @odata.nextLink is not present we have no more records to find. We're finished!
    if "@odata.nextLink" not in nextlink_report:
        finished = True
        print("Finished following @odata.nextLink")

    # However, as above, the second last set of events still has an odata.nextLink as an empty set, so we need to check
    # if there's no more data and not write a report.
    if not nextlink_report["value"]:
        print("No additional reports found.")
    else:
        # Otherwise add the new events to our reports list.
        reports.append(nextlink_report)
        print("Found "+str(len(nextlink_report["value"]))+" reports.")
We are running a while loop, which will end when there is no "@odata.nextLink" element present in the returned JSON. Additionally, even with only one page of results, Azure AD will set this element on the first page. It's simpler for me to handle the case that there will be no results once I follow the link than finding another way not to go back to the API to see if there's more results. An aside to the aside, if no results are returned at all then this value isn't populated at all.
We should now have a list called "reports" that contains all of our results, however, this list doesn't contain a nicely parseable group of discrete events, instead it contains a list of the pages of reports, and those contain the results we are after. This leads us to:
It's time to get that good, good output. We have a few options up our sleeves:
I'm just going to go through writing the events to a file, mostly for simplicity's sake. However it wouldn't be too hard to abstract away the output functionality into whatever mechanism you'd like to use.
With file-based output the information could be picked up by a log collector such as the Splunk collector, logstash, or any number of other tools.
Here's how I'm writing out the logging data:
# Writing output to our file. Opening it in append mode, as we're going to write events line by line.

with open("riskysignin."+str(time.time())+".log", "a") as eventsjsonoutput:
    for report in reports:
        for event in report["value"]:
            eventsjsonoutput.write(json.dumps(event)+"\n")
time.time() in python generates a timestamp, a quick and dirty way to provide uniqueness to filenames, and have a reference to when it was created. You could change this code to not include str(time.time()) above if you want to keep appending to the same file every time the script runs.
The rest of this is a classic for loop, picking out the events from all the data we have and writing them line by line to a log file. In this scenario I'm assuming that the log collector is not going to parse JSON directly and will instead process the file line by line. Once each line has been parsed, (terminated by the \n you see there) it can be parsed as valid JSON somewhere else, like in a SIEM, however the file itself isn't valid JSON.
If you do want valid JSON then the following code would work:
# Writing output to our file. JSON this time.
with open("riskysignin."+str(time.time())+".json", "a") as eventsjsonoutput:
    events = []
    for report in reports:
        for event in report["value"]:
            events.append(event)
    eventsjsonoutput.write(json.dumps(events, sort_keys=True, indent=4))
That should be pretty self explanatory. For space savings you could probably remove the indent=4 argument from json.dumps, but I like my JSON files to be well formatted and pleasing to the eye.
This bit was fun, and by fun, I mean the opposite. You see the graph API operates in UTC, or Universal Central Time, aka GMT. This means that you need to be filtering based on UTC times, and not whatever your local timezone is. Not difficult if you only 100% deal in UTC time throughout the whole process, however it took me a while to pick this fact up.
Every time present in each event returned is also UTC, so you will have to convert them back to local times if you need them. Additionally the Microsoft Graph API uses ISO8601 time formats, using a "Z" appended to the end of a datetime to denote a time offset of 0. The API does not support any other time offsets, only queries performed according to UTC.
Luckily for us, python's datetime library makes this pretty easy. Go on and add import datetime to the import section of the script.
If you want to run up the python interpreter then the following code will give you an idea what you will see:
>>> import datetime
>>> datetime.datetime.utcnow().replace(microsecond=0).isoformat()
'2018-04-22T09:32:53'
Reading through the docs for datetime I can't find a nice way to add the "Z" timezone indicator to the end, but this can be hacked together with:
>>> datetime.datetime.utcnow().replace(microsecond=0).isoformat()+"Z"
'2018-04-22T09:35:41Z'
The next step is to actually get the offset that matches how many hours of logs we would like, and then to throw that in to the filter that we add to our API call to limit the range of events we see.
First step, drop the following function in at line 25 (or just after defining the body dictionary):
# Let's get our time offset, that is, the end time (now) minus the number of hours of logs we want.

def gettimeoffset(hours=2):
    # The easy party, getting the current time.
    endtime = datetime.datetime.utcnow()
    endtimeformatted = endtime.isoformat()+"Z"
    # Then we use timedelta to give us the time a number of hours ago.
    starttime = endtime - datetime.replace(microsecond=0).timedelta(hours=hours)
    starttimeformatted = starttime.replace(microsecond=0).isoformat()+"Z"
    # Return as a handy dictionary.
    return {"start": starttimeformatted, "end": endtime_formatted}
This just performs some acrobatics with dates.
.utcnow() would show that it's 00:00 UTC time. The current time is actually the end time in our query.datetime to offset by a number of hours passed in to the function (default being 2 hours).start_time in the same way as end_time and return a dictionary with our start and end times for the query.Right below that function add the lines:
# The MS Graph API uses the standard graph API syntx. Here's what we need to get events for the last time period:
offset = gettimeoffset(2)

time_query = "?$filter=riskEventDateTime+gt+"+str(offset["start"])+"+and+riskEventDateTime+le+"+str(offset["start"])
And finally find our initial call to the API to get our results (on line 62) and change it to:
risky_response = requests.get(risky_sign_in_url+time_query, headers=headers)Now this raises two problems:
Change the section just above our while loop to:
finished = False # Setting up a loop variable to let us know when we've looked at all the data in the API for our query.

reports = [] # Setting up a list that will hold all of the event reports as we follow nextlink.

reports.append(report_json) # And we will add our first report we got above. For some reason there's always an
                            # @odata.nextLink, even when there are less than 100 recirds in the first returned query.

if "@odata.nextLink" not in reportjson:
    finished = True
else:
    nextlinkurl = report_json["@odata.nextLink"]  # Getting the URL for the next set of events.
Note that the nextlink_url = report_json["@odata.nextLink"] assignment has moved in to an if statement to handle the logic for no additional reports.
I jacked the hours in the past I wanted to query up to 20000 and ended up getting events again just to be sure the query worked. You might have to do the same.
And now you should be all done! I've gone and neatended up the code and I'll make it available somewhere shortly.
I hope this helps get your started. In theory the concepts could be expanded to support a bit of a framework for getting information from the microsoft APIs, or for enriching events by pulling in data from other sources, or maybe you just needed to get some data in to a SIEM. Either way, have fun!
Request a consultation with one of our security specialists today or sign up to receive our monthly newsletter via email.
Get in touch Sign up!